How to create a new convBot using Tars Bot Builder

We have finally released our convBot Builder and I wanted to take you through a quick tour of how you can get started with it.
What this means : You can create your own convBots and deploy them right away.
Let’s get started.
In case you want to skip all the text, here is a video tutorial about creating a ConvBot from scratch.
1. Creating an Account
You need to sign up and create an account here : https://admin.hellotars.com/#register

In case you already have an account on Tars, you can go here and just login with your credentials : https://admin.hellotars.com/#login
2. Creating a new convBot
Once you are in the dashboard, click on “Create a new convBot” to enter the Bot Arena.
Give your bot a name and you are good to go.

3. Adding a Gambit
You will now be in your Bot Arena and this is where you are going to create your chat flow. The first step is to click on “Add Gambit”.
Gambit means one single back and forth conversation between the bot and user.


4. Making changes in the gambit
Now that you have created your first gambit, it’s time to add the messaging that will go in the chat flow.
The bubbles you see here are the actual messaging bubbles that go in the bot. You can simply add the questions/statements here and then select the kind of user response from the dropdown menu.

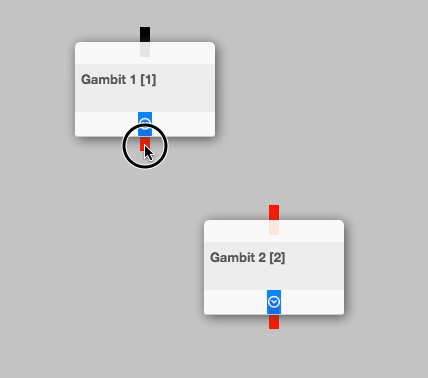
5. Connecting two gambits
Once you are done with the first gambit, add the second gambit.
A series of gambits makes a conversation and you will have to join one gambit to the other for the conversation to flow. The gif below show you to make a pipe connecting two different gambits.
6. Adding an image/gif
To add an image/gif in the gambit, paste the image/gif url in the message bubble and then click on “Add Message Bubble” or “Save” button. The image/gif will appear in the message bubble as soon as you click on either of these.
You can use any image hosting service like imgur.com to upload an image and then paste the image url here. Don’t worry, the image url will be not be visible in the live bot.
Example of Image url format- http://i.imgur.com/6Z2VStD.png
Example of GIF url format- https://media.giphy.com/media/xUPOqFfyBzvODVNTNu/giphy.gif
Giphy.com is the best source to get gifs.

7. Adding Input UIs
Input UI is a custom keyboard that appears for different kinds of user responses. For instance :
- If you want to collect feedback, you can use star rating
- Use date or time scroller if you want to ask for someone’s date of birth
- For multiple choice options, use the button UI
To select a specific UI, click on the dropdown menu as shown in the image and pick the element you’d like to add.

You can read about all the input UIs and what each one does here : https://uxdesign.cc/how-we-went-about-creating-input-ui-elements-for-our-chatbot-platform-131bdb02e8ae#.o39x2xwgf
This should help you get started. We will be adding more to this tutorial and explain more about each feature.
Once you are done creating the chat flow, all you need to do is click on the Deploy convBot and then go to the Live Link to check out your bot.


Recommended Reading: Check Out Our Favorite Blog Posts!

Easy Marketing Optimization with Chatbots – Beginner’s Guide

Using a Chatbot for Commercial Real Estate – Beginner’s Guide

AI for Internal Communications and Employee Management

Our journey in a few numbers
With Tars you can build Conversational AI Agents that truly understand your needs and create intelligent conversations.


years in the conversational AI space

global brands have worked with us

customer conversations automated

countries with deployed AI Agents